Don't just drag & drop photos onto a web page!
Sorry to disappoint, but this isn't a lesson on taking photos or how to drag a photo from your phone into a space on your WordPress site. What I want to do is help you avoid some of the pitfalls when applying images to your website, so you can display the right image for the page style and screen size.
Before I start rambling on about some things which code-savvy web designers and developers should be familiar with, I want to make it clear that some of this could also be relevant to those of you who use website builders such as WordPress, Wix and WebFlow.
So stick with me...
Elsewhere on this site I have covered the use of oversize images on websites, and in particular where large images ideally suited for display on large screens are also being used on mobile devices.
First of all let’s remind ourselves what the whole point of a responsive website is.
Responsive Web Design
Before we had the ability to automatically detect the screen size that someone was using, the only way a website would display on a small screens, such as on an iPhone or Blackberry (remember those?) was to shrink to fit the width.
Basically everything was reduced in size so that a web page which was designed to look great on a desktop monitor or laptop would be squeezed into the tiny width of a mobile phone. This made websites on phones very difficult to use, and there were really slow to load.
That was then, and this is now...
Responsive web design capabilities allow web pages to display different layouts depending on screen size, device and orientation. For desktops and laptops it might make sense to design the page where a square image 40% of the screen width is displayed to the left of some descriptive content. This could be photo of a product, and the content could be the product specifications.
On a mobile device it might make more sense to display the product details below the image, and make the image span the full width of the screen.
So we write some code to make that happen.
Screen width AND orientation
The configuration just described might work well if the mobile device is viewed vertically in portrait mode, but if the device is rotated 90 degrees into a landscape orientation, it might make more sense to display the product image next the descriptive content in a similar way to our layout for laptops.
So we write some code to tell the page how to display based not only on screen size, but orientation too.
But in landscape mode on the mobile device, whilst the layout might closely resemble the layout on a laptop, it might be sensible to use a smaller version of the product image for mobile so the page doesn’t take longer than necessary to load.
So we write some code to tell the page that if the screen width is within a certain range AND the device is in a horizontal orientation, use a different version of the image.
Code? Mostly CSS. Let me explain...
I keep saying We write some code...
so I'll explain using as little jargon as possible.
Whether your website is coded manually like this website is, or produced using WordPress, Wix, Webflow, etc., the styling of the page is mainly controlled by CSS.
CSS stands for Cascading Style Sheets and consists of rules (or rulesets) to define the widths and heights of sections on the page, the size and position of text, images, buttons, form fields, etc.
Many web developers would argue that CSS is not code or a programming language, but I'm going to generalise and avoid splitting hairs for the sake of this article.
CSS can determine where each element displays in relation to each other, colours of the page and individual sections, whether an image has borders, and if so how thick and what colour.
The are many other things CSS can do, and one feature I want to cover now is something we call media queries.
What are media queries?
These are blocks of CSS which spring into action if, for example, the screen width is above, below or within a specified range. Orientation is also a parameter we can use in media queries, which can be useful for determining how a page should look if users rotate their phone or tablet between portrait and landscape mode.
Here are some examples of how media queries could be used in the CCS files.
@media (max-width: 800px) {
things defined to display when screen width is max 800px
}
@media (max-width: 640px) {
things defined to display when screen width is max 640px
}
@media (orientation: portrait) {
things defined to display when screen is portrait orientation
}
There are others too, but let’s keep to those relevant to the examples we described above.
Image selection based on screen width
This is the really cool bit (relatively speaking, of course!)
Remember that we want to allow a nice clear high definition image to display if the user is viewing your website on a large monitor, but a much smaller version for mobile. And if it makes sense to provide a range of intermediate images appropriate for other screen sizes, we can do that too.
Below I have shown a way where 4 different size images can be made available for a range of screen widths. In plain English this translates to:
- image-S.jpg will be used for screen widths up to 519px
- image-M.jpg will be used for screen widths from 520-819px
- image-L.jpg will be used for screen widths from 820-1399px
- image-XL.jpg will be used for screen widths from 1400px
<picture>
<source media="(min-width:1400px)"
srcset="images/web-images/image-XL.jpg">
<source media="(min-width:820px)"
srcset="images/web-images/image-L.jpg">
<source media="(min-width:520px)"
srcset="images/web-images/image-M.jpg">
<img src="images/web-images/image-S.jpg"
alt="Examples of web image sizes">
</picture>
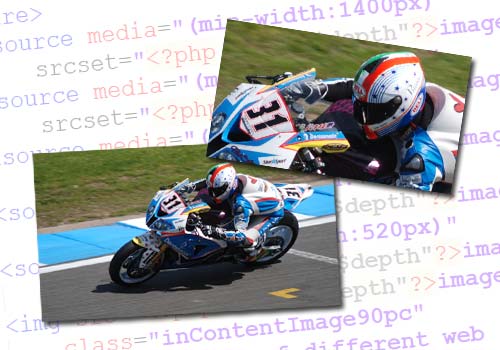
Here it is in action. You should see the most appropriate image for the screen width you're using, and if you're on a laptop or desktop and can drag the edge of the browser window to reduce and expand the width, the image should change. Try it...

Aspect Ratios of Images
Okay, so I have just explained why I have used 4 versions of one image suitable for this purpose. But it might be the case that for some designs the aspect ratios of some images might also need to be different.
If you take a close look at the selection of screens in the image below, you might notice that unless I had created specific background images for each screen size, the backgrounds for the mobile and tablet views would have not worked.
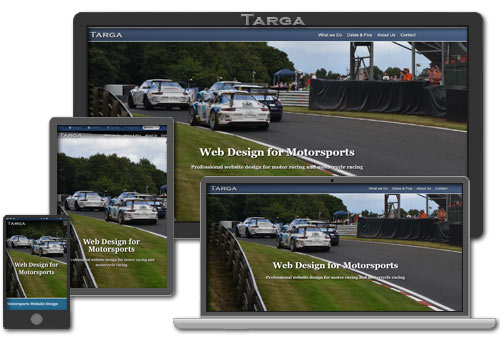
The landscape orientation of the tablet uses yet another specifically sized image. In all there are 6 separate background images used for the page shown, but the device will only need to download the version appropriate for the screen size. This is achieved using media queries.
Whether to display an image based on screensize and orientation
Displaying images based on screensize
CSS provides a nice and easy way to prevent something from displaying at all, using display:none
We could be tempted to use display:none with media queries like this:
@media (max-width: 640px) {
.noMob {display:none}
}
Then by using the class .noMob any element this is applied to will not display if the browser width is 640px or less.
In some cases this will make sense, as there could be parts of a page which we don’t want to display on mobile, and some parts that we ONLY want to display on mobile. But there is something to be aware of where images are concerned...
If we apply display:none to an image or a section containing an image, although it wont display, it WILL still be downloaded.
Is this a problem?
Well yeah!
Using the CSS parameter display:none
If we have deliberately gone to the effort of creating small images to use on mobiles whilst the larger images are for use on laptops and desktops, by using the display:none method in this way we could actually make things worse!
Here's why...
Let's say that we create a large image which is only intended for use on laptops and desktops, and the size of that image is 300kb. We don't want it do display on a mobile, so we apply display:none inside a media query.
Then, specifically for mobile, we create a much smaller version of that image which is just 10% of the size of the large image, at 30kb.
When we view the page on the mobile we’ll see the small image just like we intended, but in the background the larger image has ALSO downloaded on the mobile phone, even though it will never be displayed.
So in this example we will have downloaded 330kb instead of 30kb, and this could happen for every image on the page if the same method has been used.
By contrast the earlier method we looked at using the SRCSET attributes, only causes the correct image we want to download. So out of the two methods, go for SRCSET instead of display:none
Using display:none with images
To demonstrate this point, I cleared the browser cache on my phone and then loaded a web page which doesn't have any images to display. When I viewed the cache again, it showed that just 0.20mb of data had been downloaded.
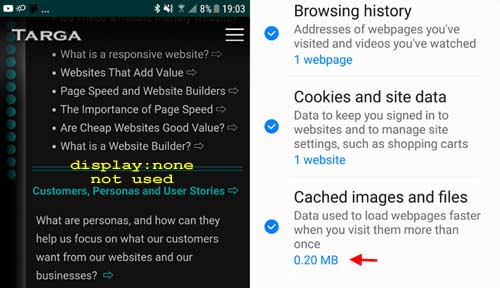
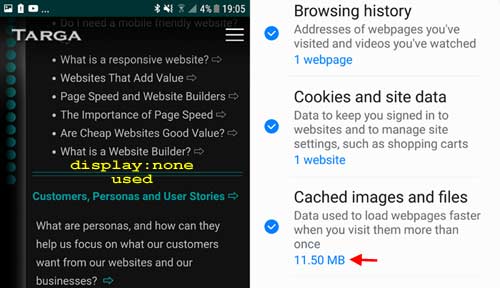
I then cleared the cache again, and re-displayed the same page. However, before redisplaying the page I applied a line of code using which targets a large image in excess of 11mb, but as I don't want it to display on my mobile I used display:none to keep it hidden.
That line of code was applied at the position indicated in yellow in the screenshot below. As you can see, the image does not display, but the amount of data downloaded was 11.5mb
In reality that's far too much data for any web page to use, but my point is that it wasn't intended to display on mobile and it doesn't display, but it was still downloaded.
So please bear this in mind when using display:none. It can be used to good effect for displaying or suppressing sections of a page or sections of text, but use caution where images are concerned.
A method which works
There are often different ways of handling a situation, so here's one which works for me when I want to control whether or not an image displays for a specific screen width. It uses the SRCSET method instead of display:none
When we looked at SRCSET earlier it was for the purpose of selecting the most appropriate image to use for a range of screen sizes. What we want to do in this instance is display an image ONLY when the screen size is within a specific range, otherwise don't display an image at all.
Here's how...
We're still going to use two images, but one of them is going to be a tiny transparent square, just 1px wide. It will be used when we don't want to see the main image, but it will be invisible.
In this example we don't want to display a specific image on a mobile device, and so we're setting the screen width limit to 540px.
<picture class="noMob">
<source media="(min-width:540px)"
srcset="images/web-images/photo-L.jpg">
<img src="images/1pix.png"
alt="Examples of web image sizes">
</picture>
Note that class="noMob" has been added to the <picture> tag.
The reason for this is that I have some styling definitions applied to the images on this page which. Amongst other things these CSS styling definitions control the width, border thickness and colour, and applies rounded corners to the images.
The same styling has been applied to this image, but to prevent the tiny 1x1px image from also having those styling definitions applied and causing a box to display on a mobile device, the noMob CSS class will prevent that piece of code from being displayed.
Here's how I have defined that simple CSS class, which you'll see uses display:none and is wrapped inside a media query set for a max width of 540 pixels.
@media (max-width: 540px) {
.noMob {display:none}
}
Here it is in action, but you will only see the image if you're viewing on a screen wider than 540 pixels. If you're on a mobile and can't see an image between the two pairs of horizontal lines, it means the code is working!

I hope this has been helpful, and if there is anything you think I could help with, please feel free to contact me.
Other Web Design Posts
- Do I need a website if I have a Facebook page?
- Why are websites slow?
- Selecting images for web pages
- Websites That Add Value
- Website Builders and Slow Websites
- The Importance of Page Speed
- Web Design Pricing Transparency
- Website Builders
- Responsive Websites
- Do I need a mobile friendly website?
- Web design case study - DHBathrooms

This article was written by Daron Harvey, founder of TargaWeb. Daron is now in his 29th year of professional website design, development, testing and management, including 21 years on the development and management of Hertz multilingual global e-commerce platform.


